Friday, 11 May 2012

Herb Dressing

A friend shared this recipe she got from "Soul Veg", a restaurant in Georgia.  It's not just good on salad but on plain rice as well.
HERB DRESSING


  • 1/4 cup of soy sauce
  • 1/2 cup of soy milk
  • 2 Tbsp. of lemon juice
  • 3 cloves of garlic
  • 1 Tbsp. of Italian seasoning.

Blend Together with...
  • 2 cups of oil

Mix all the ingredients in a blender and add the oil last or it will not mix properly.

*It tends to separate rather quickly so shake before every use.

Tuesday, 8 May 2012

Ugandan Chapati Flatbread

A friend from Uganda showed me how to make an African flatbread called chapati.  I rarely use recipes & she doesn't use them at all but for the sake blogging I've googled a chapati recipe that was very similar to the chapati I made.  If you're interested, here's the link to the one I found.
CHAPATI (My version of it anyway.)
Granted they weren't perfectly round but they were good nonetheless.
  • 2 cups of Duram Atta flour (or any flour of your choice)
  • 1 tsp. of Adobo (or salt to taste)
  • 1-2 tsp. of Chief Head Curry (or whatever flavors you like)
  • 1/2 cups of finely diced onions (optional)
  • 3/4 cups of water
  • oil (for frying)

Adobo
Adobo
1, Knead all the ingredients together.  The dough should stick together into a ball BUT should be dry enough so that it doesn't stick to your skin.  If it's to dry add a little more water.  If the dough is sticking to your skin add a little more flour.
2, Divide the dough into about seven balls.
3, Oil the surface for rolling.  Roll with a rolling pin until thin.
4, Fry in a skillet until brown.
Enjoy.


Chief Head Curry

Tuesday, 3 April 2012

My Steampunk Bed

In 2007 a friend and I were talking about our plans and projects.  His girlfriend interrupted very matter-of-factly, saying that our plans were never going to happen.  She said that because all she heard was talk and was completely blind to the fact that there were stages of planning and arrangements that had to be made before anything physical could have been implemented.

She had no insight as to the details of what we were talking about.  My mistake was in not letting her know that she was talking in complete ignorance.  When I asked her why she said that, she said that if we had ANY intentions whatsoever to carry out our plans we should stop talking about them and just do them.  I realized that she's just a very stupid woman who can't see anything past the bridge of her nose.  I personally prefer the company of those who like to challenge their boundaries and think big, in other words, people with a vision.

People without visions are very mundane, negative, exhausting, and stale.  They can never use their minds to create, only consume.

My friend and I had plans that incurred expenses.  Instead of giving up, or compromising, we chose to employ patience as a resource.  To help keep our projects alive we talked about them from time to time and brainstormed, exploring possibilities.

My plan, a four-post bed, is well under way.  The structure of the bed is complete; I just have a ton of aesthetic elements that I haven't gotten to yet.  It stands over seven feet tall. When completed, this bed will have included:

1. metalworking (cleaning, cutting, welding, grinding,  and possibly bending)
2. woodworking (and finishing)
3. painting (metal)
4. architectural design
5. painting (artistic)
6. framing
7. sewing (drapery)
8. electronics (wiring) and possibly
9. stained glass
10. tatting
11. mosaic (possibly)

What can I say… to much is never enough.

I didn't possess all the skills mentioned above so I did what I could and sought assistance, or education, where needed.  I didn't have the funds for the entire thing so I went to the local dump and found bed irons, cleaned them, welded them together and made four lamps for the tops of each bedpost. 
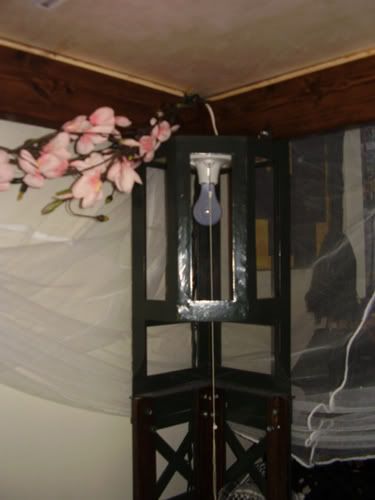
(I haven't stained the plywood above the lamps yet.)
I was about to painstakingly remove all the heavily laden rust from the bed irons when someone told me that If I get most of the rust off, there are paints that can be used over rust and the metal underneath will be fine.  I was so happy to hear that.
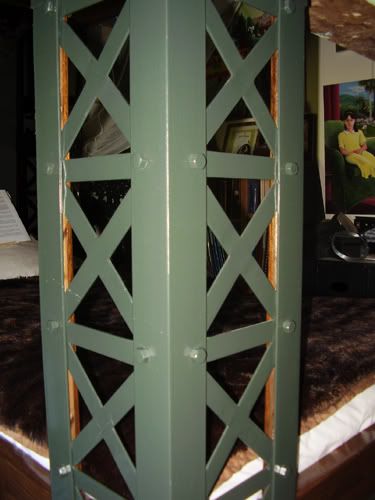
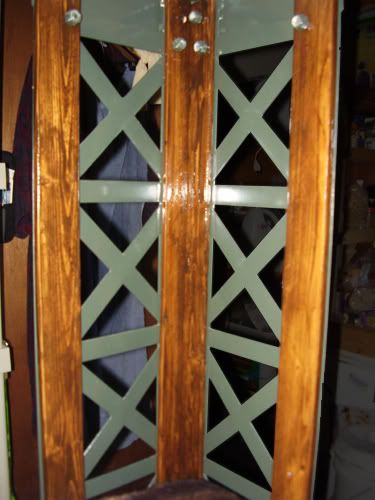
 A friend of mine was getting rid of old warped two-by-fours so I used that for the interior of the bed.  He couldn't recognize them after I cut them down and stained them.

What was the inspiration for this masterpiece?

I've always considered New York City my home and since I'm no longer there I wanted to incorporate architectural elements from NYC to remind me of home.  While I was visiting the city one day I walked across the Brooklyn Bridge and noticed the architectural elements of the Manhattan Bridge.  I saw the same industrial pattern on the George Washington Bridge and on the girders that support the trains above Myrtle Ave and Broadway in Queens and Brooklyn.  It was a metal X in a square.  There and then I decided to use that architectural element for my bed posts. 


While at the machine shop the guys would occasionally joke with me saying that I was going to be sleeping on a bridge.  At first they couldn't figure out what I was doing.  Some thought I was building a cage.  All they saw was me cutting tons of small pieces of metal. Afterwards they were blown away.  One woman said that I should get a black sheet with yellow stripes down the middle so that it could look like a street.  We laughed.

 Every time, and I mean EVERY TIME someone sees it for the first time, I get the "WOW" factor from haters and admirers alike, so I know it's coming out pretty awesome.  On several occasions people have told me that it is very masculine.  That's perfect because I didn't want anything "pretty".

The funny thing about it is that when people asked me what style I built it in, I honestly couldn't say because it has elements from different time periods. I use to say that it's primarily Industrial with touches of Victorian and Gothic. It actually is steampunk. While I designed & built it I had no idea that a steampunk genre even existed much less the word itself. As I was finishing the for metal bedposts my friend with the ignorant girlfriend came and described my bed as steampunk.
“What's that?” I asked him.
“Google it,” he said. So I did and found the genre of my heart. I love steampunk and I love my steampunk bed. 

Even though it's not finished and probably won't be for a good while, I'm happy with it.  It is beautiful, it is original, and provides me with plenty of storage above and beneath.

This bed is a big reason why I haven't been painting to much but I'm not down about it because I consider it a sculpture. Granted there are many things I would've done differently but for being my very first project in metal I think it's great.

I welcome all comments (ESPECIALLY if you're into steampunk).

Sunday, 18 March 2012

Cast Iron Vegan Cornbread

Granted this recipe doesn't have the buttermilk & all the a lot of the other traditional ingredients normally found in cornbread but it's very easy & very good.

Cast Iron Vegan Cornbread
EVERYONE who had some fell in love with it.

  • 3 cups of cornmeal
  • 3 1/2 cups soft flour
  • 1/8 cup baking powder
  • 1/4 Tbsp salt

  • 2 cups margarine
  • 2 ½ cups sugar
  • 3 ½ cups of water

1, Mix first 4 ingredients well.
2, In a separate bowl, cream margarine & sugar, then add the water.
3, Combine wet & dry ingredients.
Pour into 2 greased cast iron skillets or equivalent cake pan.
Bake convection oven at 250 degrees for 30 minutes, then turn up to 325 degrees until golden.
Gas oven at 425 degrees for 45 minutes
Cast Iron cooking is the absolute best.
Yea I went a little crazy with the camera but what can I say, I've wanted to try a cast iron cornbread for a very long time now.

I'll save you the last piece.

Tuesday, 21 February 2012

Sorrel Juice

What can I say except that I've been converted to sorrel.  Its good and good for you.  It reduces high blood pressure and acts like an air conditioner whether you're suffering from a fever or even if it's just an unbearably hot day, it will cool you down.  Usually sorrel packages come with instructions in the back but if it doesn't here's a very simple & basic recipe.
Sorrel steeping with a stick of
cinnamon.  (No, I'm not canning
it.  I just like steeping in glass as
opposed to plastic.)


Sorrel Juice
ingredients:
  • 1/4 cup of dried sorrel blooms
  • 4 cups of water
  • 1 cinnamon stick
  • sugar or honey to taste 
1, Boil the water and steep the sorrel blooms & cinnamon stick for at least 4 hours.  (Some like to steep overnight.)

2, Strain out the blooms & cinnamon stick, sweeten  and enjoy. Now seriously, how easy is that?

__________________________________________

I've been coming across the medical benefits of this delicious juice.  If you're interested, click on one of the links below...

http://doctorschar.com/features/jamacian-sorrel/

http://health.wikinut.com/Health-Benefits-of-Sorrel-Roselle/12f7l1qa/

http://www.ageless.co.za/rosella.htm 

http://caribrock.blogspot.com/2008/12/health-benefits-of-jamaican-sorrel.html

Monday, 20 February 2012

Juice Jelly


Sorrel Jelly made with this Juice Jelly recipe
Granted I did play around with the original recipe a little, I used golden brown sugar instead of white and I made my own juice from dried sorrel flowers instead of just using fruit juice.  But still I recommend that you give this a try because you can make it in any flavor you like.  It's for that reason that I'm giving just the basic recipe for juice jelly.  I found this recipe at cooks.com, here's the link.  It was originally a raspberry juice jelly. 


Juice Jelly

  • 2 cups of fruit juice
  • 4 cups of golden brown sugar
  • 2 (3 oz.) pkg.s liquid fruit pectin
In an *oversized pot, combine juice and sugar. Stirring constantly, cook over medium heat until sugar dissolves. Increase heat to high and bring to a rolling boil.

Stir in pectin. Stirring constantly, bring to a rolling boil again and boil 1 minute longer.

Remove from heat, skim off foam. Store in sealed jars. If you're not familiar with canning, here's a link to a good site that shows you how.

Yield: 2 pints.

I used Certo pectin.
*I specified an oversized pot because in order to activate pectin, you HAVE to let it boil in a good hard rolling boil for a minute or it won't set right.  In an oversized pot the boiling liquid won't overflow into a mess.

Sunday, 29 January 2012

Carrot Pineapple Muffins

Again this came from an industrial kitchen so if you don't want to make 120 muffins, cut back on the ingredients.  Also, these muffins are a little on the greasy side so you might want to cut back on the oil a little more.

Carrot Pineapple Muffins
dry ingredients:
  • 15 cups of soft flour
  • 9 cups of sugar (unpacked)
  • 1/2 cup of baking powder
  • 3 Tbsp +1 tsp of cinnamon
  • 1 Tbsp +1 tsp of salt

wet ingredients:
  • 5 cups of water
  • 3 Tbsp + 1 tsp of vanilla
  • 6 2/3 cups of oil
  • 10 cups of grated carrots
  • 5 cups of crushed pineapple with juice

1, Sift dry ingredients together in a bowl.
2, Beat together the water, oil & vanilla.
3, Blend the crushed pineapple in a blender or food processor.
4, Mix well all the ingredients together.
5, Use 1/3 cup ice cream scoop to fill muffin cups.
6, Bake in convection oven at 325 degrees for 15 to 20 minutes.